It's 10:47pm on Sunday the 28th of November. It has been forever since I posted, sorry! I have been a mixture of too busy and too lazy, but the cooking has never stopped!
Since the last update I have made gluten free chocolate brownies, readily eaten by my softball team! (we have our final this week - wish us luck!) Also, I made chicken, mushroom and zucchini pasta for lunch on Saturday.
But the food highlight was most definitely my Korean friend taking me to a local Korean place her friend owns. It sells a mix of Korean/Western food - for $1.50 I got some spicy chicken, a meat parcel and this really tasty thing that was noodles coated in sauce, wrapped in seaweed before being battered and fried. This was probably my favorite thing, though it was all so good, because of the texture combination of the soft noodles and the crispy batter. It is now 11:06pm and I am starving just thinking about it! We had to run in the pouring rain to get it and got totally drenched, but it was so worth it!
So, the Gluten free brownies are a huge favorite with all my friends. The reason I originally made them was for my friends who is gluten intolerant, but they tasted so good that I just kept making them! they are really easy - chuck ingredient in a bowl, mix, bake and hey presto! I like to add nuts in for a bit of crunch, but what ever floats your boat - they taste fine without.
I woke on Saturday morning feeling industrious, so went to the shop 'round the corner and bought myself six mushrooms, one zucchini and three chicken thighs. An hour later and I had added these things to a tomato sauce, added shallots, garlic and plenty of chili, cooked some pasta and bam! Lunch was served! It turned out better than I expected, I just cooked the zucchini and mushroom before adding them to the sauce at the last minute so they provided a nice texture. An easy lunch for the sporadically industrious among us!
11:13pm and time for some exciting news! Next week is 'integrated studies' at school. This is a themed week where you spend all your time - normally in groups - to complete a project to present to the rest of the grade on Friday. We have one a term, so three in total through out the year, and our final one can be spent doing anything we want, so I am going to cook. (no surprise there!)
We have limited access to the school kitchens, so I have chosen things that I need no oven for. I am going to do a gingerbread house - I will bake the gingerbread at home and decorate it at school. That will take a day, so for the other four I am going to practice my icing skills and hopefully apply them to a tiered cake (also to be baked at home.) Depending on how much kitchen time I get, I may also make a savory dish to give some variety. Will hopefully receive more details as to what time I get with an oven and stove this week!
But as part of my project, I will be blogging everyday on my progress - so my teachers are to read this blog! So, better go through my older post and check my spelling and grammar ;) But I am really looking forward to a week spent prancing about in my apron and cooking.
Last but not least, I am currently saving to make a 'culinary investment.' This referring to a set of clear mini Pyrex cup and saucers that are just to cute! and practical... If I get them, I want to try and make a coffee mousse topped with whipped cream and flaked chocolate. This would be served as a 'cuppuccino' for dessert.
11:25pm, time to end my ramblings and get some sleep...
After a little fanfic, of course
Until next time, (which will hopefully include the brownie recipe and pictures!)
Ims x
Showing posts with label Sweet - Baking. Show all posts
Showing posts with label Sweet - Baking. Show all posts
Sunday, November 28, 2010
Monday, November 1, 2010
Hello November!
Pinch and a punch for the first of the month!


The first day of November has been painful like every Monday; drag my self out of bed, get to school and start the day with a hearty dose of grammar. Not much school or even the year left now, how time flies when you are having fun!
Speaking of fun, take a walk through my front door, down the hallways and enter my kitchen!
Lets see, since I have last posted the main things I have cooked... first would be Rhubarb Tarts, Mum had stewed some Rhubarb so I thawed out some frozen pastry in a whirl of inspiration and ended up with four mini tarts. I put a bit of brown sugar on top and it caramelized nicely. They were that nice balance between sweet and that bit of sour!

Tasty Rhubarb Tarts!
Next up was Thai Green Curry, which was this weeks recipe for the "Saturday afternoon cook" when my friend comes over before she heads to church and we cook dinner together. I really enjoy those afternoons and the curry was really nice as well. While the recipe I used says you don't need to cook the chicken first, I did to avoid that slight tang of raw meat in the finished dish. I also dislike fresh coriander, so did not add that in - but those in my family who do like it added it in to thier own and assure me it gave a wonderful flavour. I'll take your word for it guys!
Finally we have Sweet Pumpkin Pie! I am Australian and it sure ain't Thanksgiving but I felt like making a pie and we had a pumpkin that needed using. I used a Kent pumpkin even though the recipe specified butternut but it still tasted good. A nice easy and relaxing dish to make, I will certainly make this one again! The pastry I used was a packet mix (yes - I feel ashamed just admitting it!) but turned out being quite nice, I only used it because I was short on time - when I repeat this recipe I will make it from scratch myself.

Sweet Pumpkin Pie - I apologize for the blur!
So, that is all from me for now. I will try and post the recipe and pictures of the curry tomorrow.
Until then!
Ims x
Saturday, October 16, 2010
Of swords and sponges
This blog may be about food, but this post will be partially about one of the other things I enjoy in my spare time : foreign (preferably Asian) films
Last night I stayed up way too late, 'bout 1am, watching two amazing films. First there was The Princess Blade which is Japanese. Next was Confession of Pain which is set in Hong Kong. They were both MAV but the violence was done in a way that was far from vulgar. The Princess Blade made me cry, it was heartbreakingly sad and the ending was not what I would call happy but it was wonderful The fight scenes using the swords were amazing, more dancing than fighting.
Yumiko Shaku who played the main character Yuki was definitely the highlight, her acting skills are amazing! The character for a large part of the film was emotionless and she did this so well.
Confession of Pain was my favorite of the two films, probably because I am a sucker for a happy ending, well, happier than the other film! The perfect mix of combat, murder, romance and intrigue, I will definitely watch this again!
So, go and out and watch these films, because sometimes everyone needs to have a good cry, and a film is the perfect excuse!
Never having made a sponge cake, I found a simple looking recipe and decided to try my luck. It was easier than I expected, and turned out very well. My greatest worry was having the two cakes ending up different heights, therefore not giving the cake the aesthetic I wanted. But both cakes turned out well.


Last night I stayed up way too late, 'bout 1am, watching two amazing films. First there was The Princess Blade which is Japanese. Next was Confession of Pain which is set in Hong Kong. They were both MAV but the violence was done in a way that was far from vulgar. The Princess Blade made me cry, it was heartbreakingly sad and the ending was not what I would call happy but it was wonderful The fight scenes using the swords were amazing, more dancing than fighting.
Yumiko Shaku who played the main character Yuki was definitely the highlight, her acting skills are amazing! The character for a large part of the film was emotionless and she did this so well.
Confession of Pain was my favorite of the two films, probably because I am a sucker for a happy ending, well, happier than the other film! The perfect mix of combat, murder, romance and intrigue, I will definitely watch this again!
So, go and out and watch these films, because sometimes everyone needs to have a good cry, and a film is the perfect excuse!
Onwards and upwards - to the food!
Today I rose late (how I love weekends!) but I did not want to waste any more of the day, so I set about doing one of the most worth while things ever in my opinion - baking!Never having made a sponge cake, I found a simple looking recipe and decided to try my luck. It was easier than I expected, and turned out very well. My greatest worry was having the two cakes ending up different heights, therefore not giving the cake the aesthetic I wanted. But both cakes turned out well.

The two sponges
I then proceeded to add strawberry jam, cream, icing and a little heart cut from and apple until this emerged from the bomb-site that was the kitchen by that stage...

The completed sponge, made with love!
Upon tasting, it certainly is very light and fluffy but a little dry. Unfortunately I don't quite know how to remedy a dry sponge, more research is in order! I really enjoyed the sponge-making process and shall embark on this voyage again soon.
Easy four egg sponge
Ingredients:
4 eggs (at room temperature)
2/3 cup castor sugar
1/3 cup cornflour
1/3 cup plain/all purpose flour
1/3 cup self-raising flour
For icing:
6 tbsp icing sugar
1 tbsp boiling water
(approximate measures)
Method:
1) Beat eggs in a small bowl until thick and creamy. With your beaters set on moderately high this should take about seven minutes
2) Add sugar, one tablespoon at a time until, beating after each addition until sugar is fully dissolved
3) Put egg mixture into a larger bowl and set aside
4) Sift remaining ingredients together three times. This helps aerate and mix the flours.
5) Sift the flour mixture into the eggs and sugar. Fold through gently until combined.
6) Separate batter evenly into two lined 20cm round cake tins.
7) Bake for about 20 minutes in a moderate oven.
8) Let the cakes cool to room temperature
9) Spread one cake with jam of your choosing and then a thick layer of whipped cream, top with other cake.
10) Make icing by mixing together the sugar and water until it become a spreadable consistency, you may need to add more/less water.
11) Spread icing on top of cake and serve!
***note cake will need to be stored in the fridge***
My next activity involved trying out my new mini-bundt tin, which is like a muffin tin except with bundts instead of muffins!
I used a tasty and moist carrot cake recipe. Remembering my previous epic fail involving bundt cakes sticking, I made sure to both oil and flour the tin before using.
It took much shaking but in the end most of the cakes turned out well, and they taste great too!

The pretty cakes
This cake recipe could also be used for one big cake if you so wish.
Sour Cream Carrot Cake
Ingredients:
3/4 cup self-raising flour
1/2 cup plain/all purpose flour
1/2 tsp bicarbonate of soda
1 tsp ground cinnamon
1 tsp ground nutmeg
1/2 cup brown sugar
1 1/2 cup grated carrot
1/2 cup oil
2 eggs, lightly beaten
1/2 cup sour cream
Method
1) Sift flours, soda, cinnamon and nutmeg into a bowl, stir in sugar and carrot
2) Combine oil, eggs and sour cream in a separate bowl
3) Mix the two elements together
4) Pour batter into prepared pan and bake in a moderately slow oven for about 50 minutes (if making one large cake) or 20 minutes (if using mini-bundts or muffin tin)
So, an interesting and tasty last few days.
Happy cooking!
Sunday, October 10, 2010
You must endure the rain to see the rainbow
The rain for me was in the form of a chocolate cake.
My mother was halfway through making it when I arrived in the kitchen, she was heading to an appointment and left it in my care.
It is a boiled chocolate cake with orange that I have made many times. But having received a bundt tin for my birthday, I decided to give that a go. It cooked well, but there was an issue...
It did not turn out whole! I went out with friends while the cake was still warm so mother turned it out and oh dear! I did grease the plan liberally with oil but it seems it was not enough. Next time I use the bundt tin I shall use both oil and either sugar or flour to stop the cake from sticking.
But the cake still tastes good, it is a family favorite being rich and moist.
Boiled Chocolate Cake
Ingredients
1 cup water
125g butter
1/2 tsp bi-carb soda
2 tbsp cocoa
pinch salt
1 3/4 cup self-raising flour
2 beaten eggs
1 1/2 cup sugar
1 tsp vanilla essence
Method
1) Put sugar, water, butter, vanilla essence, cocoa, bi-carb soda and salt into a large saucepan.
2) Over a medium heat, stir until boiling
3) Turn down heat and let simmer for five minutes*
4) Let cool until at room temperature (to do this quickly, put the saucepan into a sink of cold water and stir)
5) When cool, add the eggs and flour. Mix well until combined and smooth
6) Pour into greased and lined 22cm round tin (or any tin that hold about the same amount)
7) Bake in a moderate oven for 45 - 60 minutes
8) Let cool in tin before removing.
* the mixture will froth up - but be careful that it does not bubble over. So keep a close eye on it and use a large saucepan
Sunday, October 3, 2010
In remembrance
Today means the start of daylight savings, the start of exam revision and of course, baking.
I sit in my living room, enjoying the view on what has to be one of the most beautiful days we have seen this year. Beside me sit a glass of milk and a plate of freshly baked Anzac biscuits.
Some people like this tasty war time treat crispy, but I like them with a crunchy outside and a chewy center, mmmmm!
So today as I sun-bake, I think of all those men who went to war, some never to return, for their country.
It doesn't have to be the 11th of November to remember.
Anzac biscuits - recipe -
We had no golden syrup left in the house, so instead I used treacle. This works in much the same way, you just end up with a slightly more sweet and rich biscuit. Also, the recipe calls for teaspoon size amounts of mix per unit, I did mine a little larger, making 24 in total. The mix also was a little dry, so I mixed some more treacle with boiling water and added that a teaspoon at a time until got the consistency I was looking for.
Ingredients:
125g butter (salted is fine)
1 cup rolled oats
1 tbsp (20ml) treacle/golden syrup
1 cup desiccated coconut
1 tsp bi-carb soda
1 cup plain/all purpose flour
2 tbsp (20ml) boiling water
1 cup sugar
Directions:
1) Preheat the oven to 150C.
2) Melt butter and golden syrup/treacle in a medium-sized saucepan, then add the bicarbonate of soda that has been mixed with the boiling water.
3) Combine all dry ingredients then add in the the butter mixture.
4) Mix to a moist but firm consistency, adding more liquid if necessary.
5) Put teaspoonfuls of the mixture onto a lined tray, taking care to leave plenty of space between each biscuit.
6) bake for 15-20 minutes, or until golden brown. They will still be soft when you take them out of the oven, but will crisp up as they cool.
7) Let the biscuits cool on the tray for a while before transferring them to a wire rack.
Note: for a thinner, crisper biscuit, add an extra teaspoon of boiling water.
Enjoy!

Tasty Anzac's sitting in the sun!
Saturday, September 18, 2010
Past culinary adventures
Over the years I have done lots and lots of cooking.
This post is a collection of some of the things I have made before starting the blog.


This post is a collection of some of the things I have made before starting the blog.
Chocolate Butterfly Cakes
These cup cakes were really fun to make. I just used a plain chocolate cup cake recipe that I like and then used butter cream icing to make butterfly cakes! Getting both 'wings' even proved to be a challenge, but one that I enjoyed immensely. I did not flavor the icing, but next time I would consider adding in some orange juice for flavor. The cakes stayed moist which was good, but they do not keep very long because of the dairy in the icing. This recipe is certainly one I plan on using again!

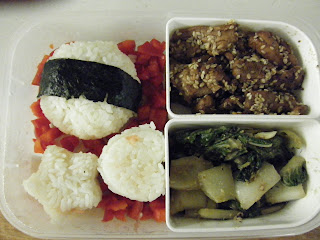
Bento box with Rice, Sesame chicken and Bok Choy
On a more savory note, this is a Bento box I made as a tasty school lunch. I used molds to shape the rice, which makes the box much more aesthetic! The sesame Chicken was nice and strong, but a little dry. The bok choy was really good, the vinegar in it balanced out the rich chicken nicely. I have made Bentos' with other things like flavored shredded carrot. They do take time, but are healthy and very tasty making them well worth it!

Gluten free banana bread
I have a friend who is gluten intolerant. I had never attempted to bake any gluten free food before and so I decided to give it a try using her as my test subject! The use of gluten free flour creates quite a dense bread, but using the mashed banana kept the bread moist so it ended up being really good. I added in walnuts for texture, giving the bread some interesting 'crunch' and serving to help cut through the density of the loaf. The banana also added a really nice flavor which kept the bread from being bland. The bread went down a treat with my friend and her family so I will definitely do more gluten free cooking in the future!

Carrot cake with cream cheese icing:
decorated with sour mandarins and choc coffee beans
Carrot cake is my Dad's favorite and I really enjoy making it. So this moist cake is a win-win situation in my house! The cake has quite a rich flavor and has chopped walnuts mixed through the batter. If you ask me, carrot cake is not complete without cream cheese icing! It is best put on thick, but the cake has to be refrigerated or the cream cheese will go off. This cake is quite rich, but not sickly sweet. I love decorating cakes and the simple pattern using the coffee beans and sour mandarin lollies turned out really well. This cake is perfect for any occasion whether it be an after-dinner dessert or an afternoon tea with friends!
So, there is just a few things I have cooked. I plan on making lots more in the future!
Wednesday, September 15, 2010
Trying out the cookie gun
For last Christmas I got a cookie gun/icing syringe. Up until today I had only used it for icing. But, feeling very extravagant I decided to make a batch of lemon cookies using it. I ended up making over 80 quite small cookies in different shapes. The shapes I used this time were a flower, a wreath, a bat and a tree.

The cookies have a shortbread like flavor and texture with a hint of lemon. Being not to sweet, they are really good and I am pleased with the out come!
I had to employ the help of my mother to help hold down the baking paper while I manned the gun because the dough had trouble sticking to the tray. I had to add more milk to the recipe to get the dough sticky enough, but emerged victorious! Because the gun can't cut the dough off, the cookie has to stick to the paper, which causes some issues!
Some of the shapes work better than others. The tree, wreath and flower turned out really well, while the bat is a bit more of a blob. I also tried to use the butterfly shape but for some reason the dough wouldn't stick, so next time when I make a different type of cookie I will have another shot at using that shape.
I had heaps of fun using my cookie gun for the first time and look forward to using it to make lots of themed cookies in the future!


Lemon Cookies
Ingredients-
230g salted butter, softened
1 cup granulated sugar
1 egg
2 1/2 tsp vanilla extract
2 1/2 cups all-purpose flour
1 tbsp milk
The zest from 2 lemons
The juice from 1 lemon
Method-
Preheat oven to 190 C (375 F)

The awesome Cookie Gun!
The recipe used was just one for plain vanilla dough that had come with the gun, but I altered it slightly by adding lemon and using salted butter. The recipe called for '2 sticks of butter' and being in Australia where we don't buy butter by the stick, I turned to my best friend in the form of the internet! There I discovered that one stick of butter is about 113g. For this recipe I rounded up from the 226g it asked for and added in 230g instead.The cookies have a shortbread like flavor and texture with a hint of lemon. Being not to sweet, they are really good and I am pleased with the out come!
I had to employ the help of my mother to help hold down the baking paper while I manned the gun because the dough had trouble sticking to the tray. I had to add more milk to the recipe to get the dough sticky enough, but emerged victorious! Because the gun can't cut the dough off, the cookie has to stick to the paper, which causes some issues!
Some of the shapes work better than others. The tree, wreath and flower turned out really well, while the bat is a bit more of a blob. I also tried to use the butterfly shape but for some reason the dough wouldn't stick, so next time when I make a different type of cookie I will have another shot at using that shape.
I had heaps of fun using my cookie gun for the first time and look forward to using it to make lots of themed cookies in the future!

The Flowers + Wreaths

Bats, Wreaths, Trees and Circles
Lemon Cookies
Ingredients-
230g salted butter, softened
1 cup granulated sugar
1 egg
2 1/2 tsp vanilla extract
2 1/2 cups all-purpose flour
1 tbsp milk
The zest from 2 lemons
The juice from 1 lemon
Method-
Preheat oven to 190 C (375 F)
- Combine the butter and sugar in a large bowl. Using an electric mixer set on medium speed, beat until light and fluffy .
- Beat in the egg and vanilla extract.
- Using a spoon, stir in the lemon zest and then the flour.
- Stir through lemon juice, then enough milk so the dough is firm but sticky.
- Either load into cookie gun or roll into small balls before flattening them out so that they are about 7mm thick
- Bake for 10-15 minutes or until golden brown.
- Enjoy!
Subscribe to:
Posts (Atom)